In this article, we’ll be discussing the meaning of Projection and also see the difference between Parallel and Perspective Projection in computer graphics.

What is Projection in Computer Graphics?
Projection is nothing but projecting three-dimensional objects view plan into two-dimensional view plan.
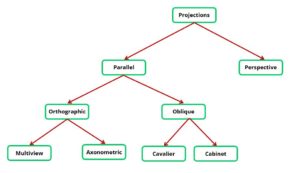
The projection lines are known as the projector through which the mapping of an image is identified. There are two methods of projection, parallel projection and perspective projection.

Perspective Projection
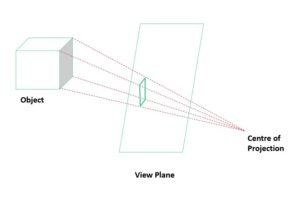
In this, all the parallel lines in the object which is not parallel to view plane are converged and the point of converging is known as the vanishing point or converging point. This vanishing point makes the object smaller with the distance.

It produces a realistic image therefore this projection is used by artists.
With the help of perspective projection, an artist tricks or say creates an illusion where the object and its size decreases with the increase in distance.
The object lines that lie before the vanishing point are displayed upside-down manner.

Characteristics of Perspective Projection:
- Vanishing Point: all the parallel lines converge at a single point called the vanishing point
- Perspective foreshortening: because of this, an object seems small from the centre of projection
- It produces an image that looks natural
- It doesn’t provide an accurate view of an object
- In this, the distance from the centre of projection to view plane is finite
- The projection lines are not parallel
- It doesn’t preserve the size of an object
- It can be classified as three types, one-point, two-point and three-point
- It is popular in photography and human vision
Parallel Projection
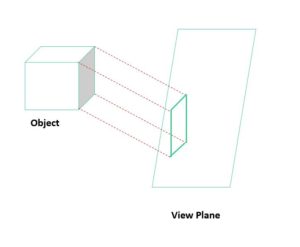
A parallel projection is a projection in which an object’s parallel projection lines are drawn without converging over the view plan. In other words, rays or projection lines in parallel projection are parallel to each other.

When projection lines are perpendicular to the view plane is termed as orthographic projection, otherwise it is termed as oblique projection.
The interaction point of the plane is called the projection of vertex. It eliminates z coordinates and instead of defining the centre of projection, it specifies the direction of projection.
Therefore, it preserves the size of the object as all the parallel lines fall at a fixed point on the view plane. This is why drafter and engineers use this principle to draw objects.
Characteristics of Parallel projection:
- It doesn’t produce an image that looks natural
- It provides an accurate view of an object
- In this, the distance from the centre of projection to view plane is infinite
- The projection lines are parallel
- It preserves the size of an object
- It can be classified as two types, orthographic and oblique projection
- It is popular in technical applications where exact measurement can be used from the image
Difference Between Parallel Projection and Perspective Projection in Computer Graphics
| Basis | PARALLEL PROJECTION | PERSPECTIVE PROJECTION |
|---|---|---|
| Definition | It is a projection where coordinates of the given object are transformed by forming parallel lines to a view plane | It is a projection where coordinates of the given object are transformed by forming converging lines also known as a centre of projection to view plane |
| Distance of object from Centre of Projection | Distance of the object from the centre of projection is infinite | Distance of the object from the centre of projection is finite |
| Accurate view of Object | It produces an accurate view of various side of an object to the view plane | It doesn’t produce an accurate view of various side of an object. In other words, Object size varies based on distance from the view plane after transformation |
| Realistic Representation of Object | It doesn’t provide a realistic representation of an object | It gives a realistic representation of an object |
| Preservation of Relative Proportion of Object | It preserves relative proportion of an object | It does not preserve the relative proportion of an object |
| Types | There are two types of Parallel projections: orthographic and oblique parallel Projection | Perspective projection can be one-point, two-point and three-point perspective projection |
| Line of Projection | Object’s projection lines are drawn without converging over the view plan. In other words, they are parallel | Object’s projection lines are converged over the view plan. In other words, they are not parallel |
| Projector | In case of parallel projection, projector is parallel | In case of perspective projection, projector is not parallel |
| Application | It is used by drafters and engineers use this principle to draw objects | It is used by artists to produce images which look natural |
Parallel and Perspective Projection Comparison:
1) Due to converging property of perspective projection, the image seems more realistic, whereas in the case of parallel projection this property isn’t present, likewise, it doesn’t produce a realistic image.
2) Perspective projection doesn’t preserve the size of an object, while parallel projection does as all the projection lines fall in a perpendicular to the view plane.
3) Since Perspective projection does have a converging line and ends up at a vanishing point, therefore, the distance of the object from the centre of projection is finite. on the other hand, Parallel projection has infinite distance from the centre of projection.
4) The projector or projection of direction is not parallel as the parallel lines get converged, whereas the projector is parallel if we talk in case of parallel projection.
5) Perspective projection fails to correct view of an object while parallel projection does provide the correct view of an object.
6) Coordinate lines of an object are not parallel in case of perspective projection, whereas the line is parallel in case of parallel projection.
7) One-point,two-point and three-point projection are the types of perspective projection. orthographic and oblique are the types of parallel projection.
8) Perspective projection is mainly used by artists and painters, whereas Parallel projection is used by engineers.

